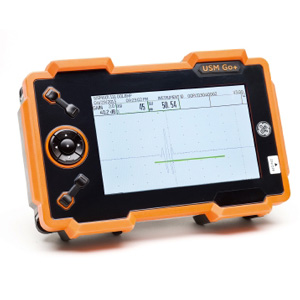
Description
Features & Benefits
- Lightweight (850g)
- Record up to an 8-minute video for review on the instrument or free PC player
- TrueDGS® Defect Sizing with highest available accuracy
- Back wall Echo Attenuation helps to detect extreme small defects
- IP67 Protection
- 800 x 400 bright colour LCD (>200cd/m²)
- USM Go+ is extendable to DMS Go+ Thickness Gage instrument
- Equipped with an arrow-keypad and the latest industrial electronics
- Ambidextrous use with flip function of screen & controls
- Phantom echo identifies echoes from acoustic wrap around by a sideways movement on the screen
- AUTOANG (Auto Angle) feature calculates the refracted angle of an angle beam wedge and utilizes it for Trigonometic flaw location projections
- Standard USB connection to allow data to be downloaded from the flaw detector for further analysis or storage
- Reports produced in jpeg or bmp format
- No need for special reading software programs or interface cables
- A simple on-board data logger to collect and save thickness measurements
Applications
A wide range of applications
The USM Go+ has been designed to provide flaw detection capability in inspection situations throughout the industrial and process spectrum, from aerospace to power generation and from the automotive sector to the oil and gas industry.
Weld Inspection:
• Trigonometric projections with curvature correction.
• AWS D1.1 sizing
• DAC/TCG
• DGS
• Color Leg
Inspection of Forgings and Castings:
• Manual PRF adjustment
• Phantom echo indicator
• DGS
• Backwall Echo Attenuator (BEA)
Inspection of rails:
• High PRF (up to 2000 Hz)
• Lightweight: 850 g (1.87 lb.)
• Small size and ergonomics
Inspection of Composites:
• RF Display
• 2 gates with B-start triggered with echo in gate A
• TCG correction with high slope 120 dB/μs
• Reflector depth indicated in layer
For more demanding applications:
• Narrow band filters
• Low noise digital amplifier
• Square wave pulser
Specifications
| Display | 5 inch,
800 x 480 pixels, 108 × 65 mm (W x H), >200 cd/m2 |
| Size (W x H x D) | 175 x 111 x 50 mm |
| Weight | 850 g with battery |
| Protection class | IP 67 |
| Operating temperature | 0 – 55 °C |
| Battery | Li-Ion, rechargeable,
6 hours operation time |
| Power adapter / charger | 100 – 240 V AC, 50/60 Hz |
| Probe connector | 2 x Lemo-00 (T/R) |
| PC interface | Mini USB |
| Memory card | SD-Card 16 GB max |
| Reporting | Test report and A-Scan screen shot on SD-Card,
Video recording of A-Scan |
| Pulser | 120 – 300 V,
30 – 500 ns, flank < 10 ns, Spike, Square wave option |
| Pulse Repetition Frequency | 15 – 2000 Hz |
| Damping | 50 and 1000 Ohm |
| Receiver | 110 dB dynamic, 0.5 ~ 18.5 MHz analog bandwidth |
| Filter | BB
1-5 MHz, 2,25 MHz, 4 MHz, 5 MHz, 10 MHz, 13 MHz, 15 MHz |
| Gates | A and B independent, B triggered by A, C option |
| Units | mm, inch, μs |
| Options | AWS sizing tool (AWS D1.1),
DAC 16 points according to EN 1712, EN 1713, EN 1714, ASTM E164, TCG 110 dB dynamic, DGS sizing tool according to EN 1712, EN 1713, EN 1714, ASTM E164, Data Logger, 3rd gate C, Square Wave Pulser |
| Compliance
|
EN 55011,EN 61000-6-2: 2011,
EN 12668, ASTM E 1324, E317, ANSI/NCSL Z 540-1-1994, MIL-STD 45662A, MIL-STD 2154 |


